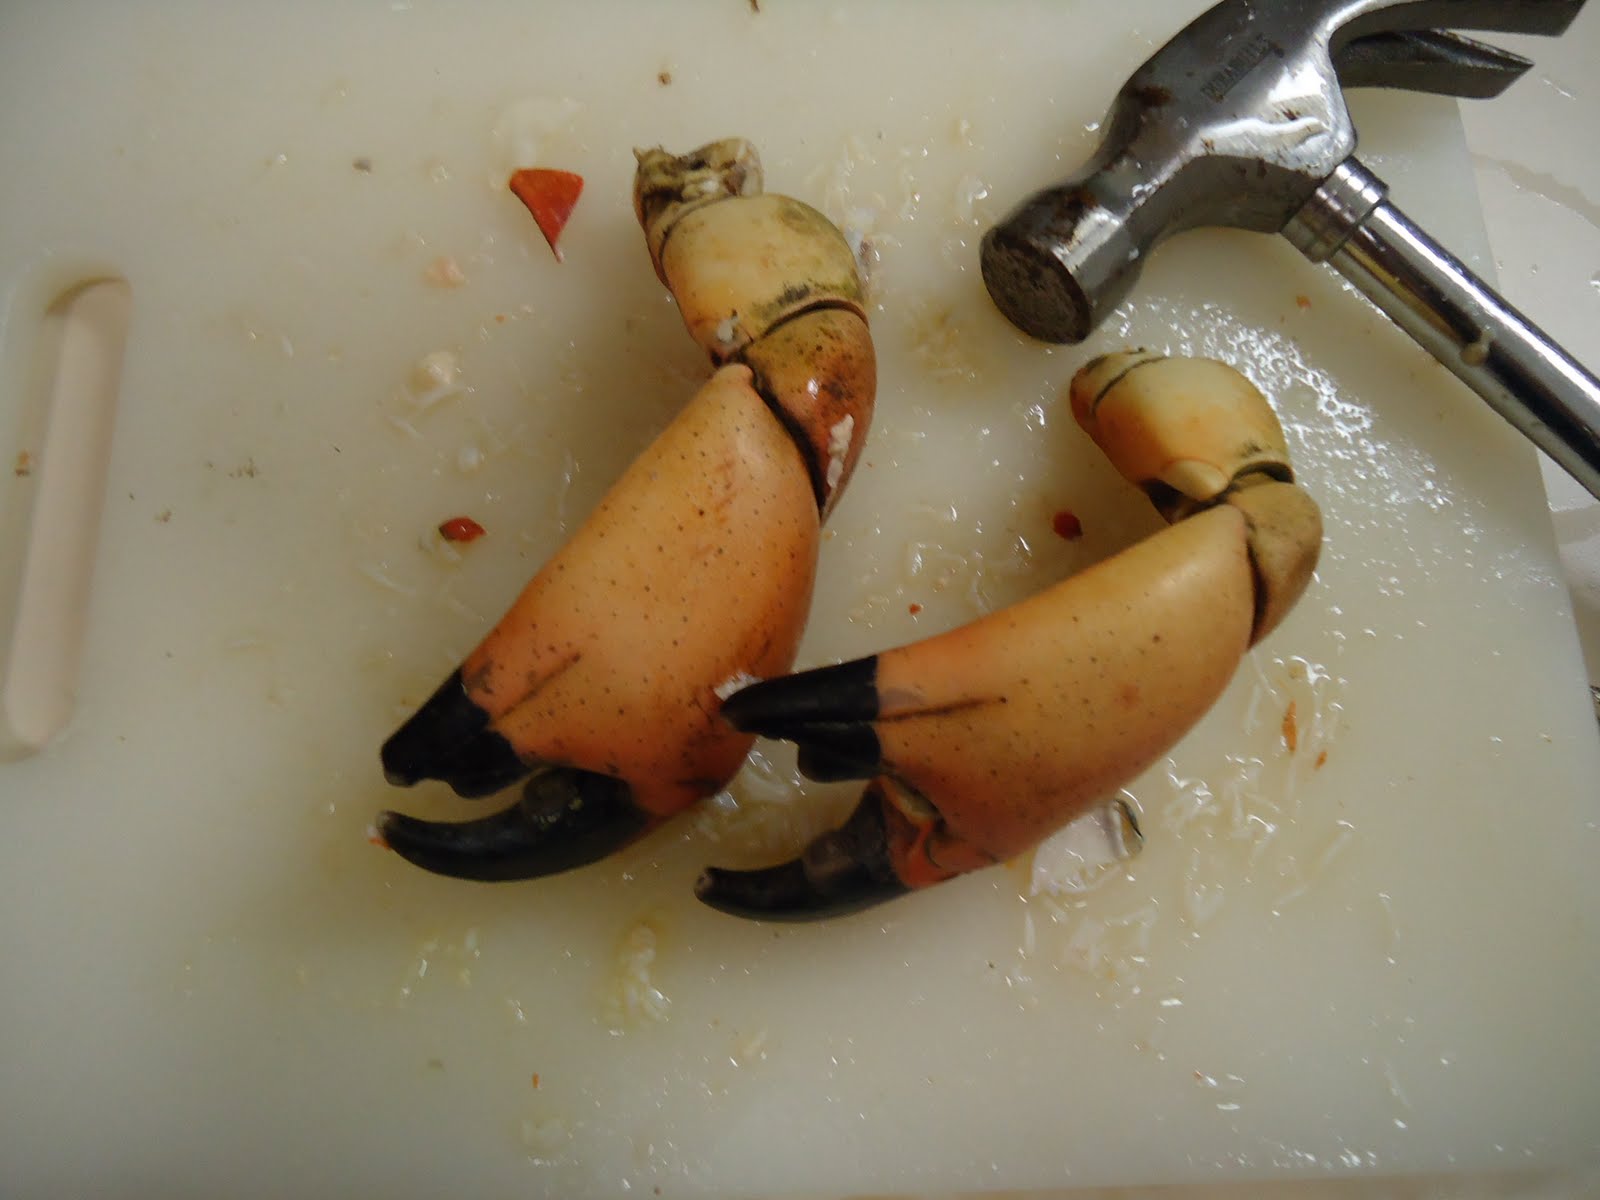
We followed this recipe of Paella rice with spider crab and peas, using instead the meat from the stone crab claws. The stone crab claws where extremely hard to open--I think the crabs were named for having bodies as hard as stones. It took a series of serious whacks with a hammer to break the shell, but the reward was large chunks of a very sweet crab meat. I wanted to share a few pictures of the preparation of this fabulous paella before I transition to vegetarian meals from my new favorite book.
Saturday, August 27, 2011
The joys of Galveston--Stone Crab
We followed this recipe of Paella rice with spider crab and peas, using instead the meat from the stone crab claws. The stone crab claws where extremely hard to open--I think the crabs were named for having bodies as hard as stones. It took a series of serious whacks with a hammer to break the shell, but the reward was large chunks of a very sweet crab meat. I wanted to share a few pictures of the preparation of this fabulous paella before I transition to vegetarian meals from my new favorite book.
Welcome to Galveston
This morning I went to the Katie's Seafood market on pier 19 and bought 12 stone crab claws and 2 pounds of gulf shrimp. As a first year student, I anticipate being short on time from now until at least next May. Thus, I thought it appropriate that my first blog post from Galveston be a time saving recipe--quick and easy shrimp ceviche. Though ceviche is simple to prepare, in order to denature, the raw fish has to stew in the lime or lemon juice for at least 3 hours. In my ceviche, the shrimp is pre-cooked and the mixture only has to sit for an hour to develop flavor.
Ingredients:
3/4 cup lime juice, about 8-10 limes
5 green onions, sliced thinly, going a few inches into the green
1 red jalapeño and 1 green jalapeño, minced (I only used half of the green to limit the spiciness)
1 cup cilantro (about a handful), finely chopped
10+ cherry tomatoes, quartered
salt, pepper, olive oil
For Serving:
tortilla chips
salsa
1. Peel and clean the shrimp. For aesthetics, I sliced the shrimp in half lengthways.
2. While cleaning the shrimp, fill a large pot with 4 inches of water. Once the water comes to a boil, set a metal colander in the pot.
3. Add the cleaned and sliced shrimp to the boiling water. Cover the colander and steam the shrimp for 8 minutes, stirring occasionally, until most of the shrimp are white and pink. Remove the shrimp from the water and set aside to drain and cool. When cooled, transfer the shrimp to a flat dish; I used an 8x8 pyrex dish.
4. Juice the limes into a measuring cup.
5. Slice the scallions, mince the jalapeños, and add them to the measuring cup with the lime juice to soften while you chop the cilantro and quarter the tomatoes.
6. Pour the lime juice mix onto the shrimp and toss, making sure to coat the shrimp.
7. Add the cilantro and tomatoes, toss again. Season lightly with salt and pepper.
8. Let the ceviche sit refrigerated for at least an hour, you can leave it for longer for stronger flavor.
9. When you are ready to serve the ceviche, use a sieve to drain only the lime juice from the shrimp. Transfer the shrimp back into the serving dish, sprinkle with about two tablespoons of olive oil and toss to coat the shrimp.
--The olive oil helps smooth out the bite of the lime juice, but if you like the sour bite, reserve some of the lime juice and mix it with the olive oil and make a dressing to coat the shrimp.
10. Serve the ceviche with tortilla chips and your favorite salsa.
Saturday, March 19, 2011
Homage to Palena Cafe: Lamb meatballs in red sauce with mozzarella
When I visit a new city I am more likely to eat at ethnic restaurants that represent a prevalent immigrant group (ie Ethiopian in DC) or eat at a place that serves a current food trend (ie meatballs in NYC). My parents, however, live in a small suburb of Austin, Texas, and they rarely eat out at "nice" Continental restaurants in Georgetown, Texas or even in Austin. The reasoning is, for less money my mother can probably recreate the meal using better ingredients and they can drink better wine in the comfort of their own home. So while my parents would never go to a continental restaurant like Palena Cafe or Dino's or West End Bistro in Austin, they like to go to places like that in DC because the food is delicious and worth the money.
I loved what my mother ordered at Palena Cafe: lamb meatballs and mozzarella pearls in red sauce served over creamy polenta. Just like the frito misto I love at Palena, the lamb dish is seemingly simple in its composition but not easy to recreate. Thanks to my boyfriend and his family, I was able to use farm raised ground lamb (just like Palena) to make the meatballs, but even with that special touch, my dish was a far cry from Palena's version. My final product was similar in spirit, but needless to say I will still be spending large chunks of my paycheck eating out at restaurants above my pay grade...
Lamb and cheese balls in red sauce served over polenta:
Tomato wine sauce (recipe adapted from a friend of a friend)
olive oil for sauteing
1 medium onion, finely chopped
2 medium garlic cloves, minced and 1 whole garlic clove for flavor
1/4 tsp salt
3 tablespoons fresh oregano
1 1/2 cup red wine
1 28 ounce can canned tomatoes, undrained
salt and ground black pepper to taste
1. In a medium size pot, add enough olive oil to cover the bottom of the pot and saute the chopped onions and minced garlic until the onions are translucent. Add the chopped oregano and about a teaspoon of salt and saute for a few minutes.
2. Add 1/2 cup of the red wine and allow it to come to a boil; stir to incorporate the onions. 3.While the wine is heating, pour the canned tomatoes in the food processor and puree them until smooth. (Don't skip this step like I wanted to--chunky tomato sauce will ruin this dish.)
4. Add the pureed tomatoes, 1 cup of wine, and one whole garlic clove into the pot. Stir, turn the heat to medium-low and allow the sauce to simmer for 20 minutes stirring occasionally. If the sauce tastes too much like wine for your taste, add a cup of water.
Lamb meatballs (make while the sauce is simmering and the flavors are melding)
olive oil for frying meatballs
1 pound ground lamb
1/2 cup corn meal
1 egg
1. Combine the ground lamb with cornmeal and egg. Mix really well with your hands or spoon.
If you have time, let the mixture set for 30 minutes or more. I find this helps the meatballs stay together while they cook.
2. Roll the lamb mixture into 1 inch diameter meatballs.
3. In a small frying pan, add enough oil to cover the bottom. Heat the oil over medium-high heat, and add the meatballs when the oil is hot.
4. Cook the meatballs until they are brown on all sides and then for a a few minutes longer so they are not very pink inside.
5. Cook all the lamb meatballs and set aside for assembly.


Cheese balls--two options
1 cup ricotta cheese
1 cup shredded mozzarella
1. Combine the cheeses in a bowl. Form balls slightly smaller than the lamb meatballs.
2. Set aside until assembly.
OR
1. Go to Whole Foods and buy a container of pearl mozzarella.
Polenta
I bought the ready-made kind that comes in a tube and heated in the microwave with some milk and water and whipped it until fairly smooth. It's lazy I know, but this recipe is already too long.
Assembly
1. Pre-heat oven to 350 °F.
2. In a oven-safe frying pan or dish, pour in enough sauce to have a 2-3 inch layer of sauce. Arrange the meatballs and cheeseballs in whatever artful arrangement pleases your eye.
4. Dish out polenta into bowls--about 1 cup per person.
5. Serve the sauce with meatballs and cheeseballs on top.
6. Enjoy.
Thursday, March 10, 2011
Homemade Frito Misto
One Saturday a few weeks ago, Sam and I went the to the DC fish-market out on the Southwest waterfront and bought 1 pound of shrimp, 1 pound of cod, and 1 pound of squid. We also added onions, broccoli, and lemon slices to our list of things to fry.
Wednesday, February 9, 2011
All American meal: Fried chicken and Baked Alaska
After dredging the chicken in the paste and then the flour, and repeating these steps, the chicken is fried in about 1/2 inch of hot oil. My best advice is to use chicken thighs because the meat stays more moist during the frying process. In the case of this fried chicken, the best directions are to follow the Mark Bittman recipe and watch the Minimalist video to get an idea of how think the paste should be and how long to cook the chicken so it still retains its tenderness and moisture.
The second part of the meal that was totally foreign and new to me was Baked Alaska. I originally thought Baked Alaska was a savory dish involving salmon and heaps mayonnaise; the type of recipe published in woman's magazines in the 1960's, aimed at Betty Friedan's target audience whose main concern was feeding the men of the greatest generation. Apparently Baked Alaska is actually a mountain of sugar encased in a layer of meringue. My friend who came to dinner brought the components of the dessert: brownie, butter pecan ice cream, and eggs.
Tuesday, February 8, 2011
(Valentine's Day?) Chai Truffles
I have a killer sweet tooth...one that will probably kill me through either diabetes or choking on a piece of hazelnut in a chocolate bar when I'm seventy. As I have stated earlier, I am not a great baker and as I learned last night, I'm also not a great confectioner, but I did have fun making the truffles. The truffle making process was too sticky, too messy, and did not yield (in my opinion) a very aesthetically pleasing product. Though, I have to give a shout out to my boyfriend, he is an excellent truffle maker and ended up rolling up most of the truffles and certainly made all the pretty ones.
The idea to make these truffles came from my boss who wanted to make them herself but didn't have the time. She kindly provided me with the spices required for this recipe, so I could make these truffles as a Valentine's day treat for my lab. I was intrigued by this recipe, because I only recently learned how to make authentic chai tea. Chai tea, for those who have only ordered it at Starbucks, is black tea simmered with a combination of aromatic spices that usually includes cinnamon, fennel seed, ginger, cardamom pods, and cloves. Using the same spice and tea mixture with a base of chocolate appealed to my taste buds.
Chai Truffles (adapted from the Washington Post)
Ingredients:
1 1/2 cups heavy cream
2 tablespoons loose black tea leaves (I accidentally used green tea; it tasted fine)
2 cinnamon sticks, broken in half
10 whole cloves
10 whole green cardamom pods
1/2 teaspoon fennel seeds
1/4 teaspoon salt
2 tablespoons butter
1 pound dark chocolate, if you can't find dark just buy unsweetened
about 1/2 cup cocoa powder, mixed with a few tablespoons of cinnamon for rolling the truffles
1. Coarsely chop the pound of chocolate. Then run the knife through it a few times so it has a shaved consistency. Place all the chocolate in a large mixing bowl.
2. In a small sauce pan combine the heavy cream, tea, cinnamon sticks, cloves, cardamom pods, fennel seeds, and salt. Break open the cardamom pods (I wrap them in a paper towel and then hit them with a ladle a few times) and break the cinnamon sticks in half before adding them; this allows the spices to release more of their flavor.
3. Cook mixture over medium heat until bubbles from at the edges where the cream meets with the pot. Remove from heat, cover the pot, and let the mixture steep for 30 minutes.
4. The simple directions are to return the saucepan to medium heat, add the butter and stir until it has melted. Only cook the cream mixture until it is heated through and bubbles have formed around the edge of of the sauce pan. Strain the cream and spice mixture through a fine mesh strainer into the bowl with chocolate. Discard the spices in the strainer and use a spatula to stir the chocolate until it is smooth.
(While those are the general directions, I found that the tea leaves had actually absorbed about 1/8 cup of cream. First, I strained the cream mixture into a measuring cup so I could ascertain how much liquid I had lost and also get rid of the bulk of the spice debris. I then added more cream to bring the total liquid volume back to 1 1/2 cups, poured it back into the sauce pan, added the butter to melt, heated the cream through, and then strained the cream again when I poured it over the chopped chocolate.)
5. Add all of the cream at once and the chocolate will start to melt immediately. Use a spatula to fold the cream and chocolate together, and stir the cream and chocolate until the mixture is smooth and creamy.
6. Place the bowl in the refrigerator; stir the chocolate every twenty minutes until the chocolate stiffens enough to roll into truffles. The hardening process should take about an hour or a bit longer.
7. To prepare for the truffles: Line a baking sheet with wax paper. Mix together the cocoa powder and cinnamon and spread it on a plate.
Tuesday, February 1, 2011
Fresh Pasta for everyone!
I used to avoid making my own dough by telling myself I wasn’t a baker. I am not a baker: I lack the patience and attention to detail required to be an exceptional baker. I do, however, make excellent pizza dough and now pasta dough and whose success is solely due to The Food Processor. For me the hardest part of making dough is sufficiently incorporating the butter or water into the flour to create the small doughy particles that eventually get kneaded together to make the dough ball. Yet with the food processor fresh pasta from flour to noodle in about an hour...I promise I wouldn't lie to you.
Pasta in the Rough: Fresh Pasta from Mark Bittman
Ingredients:
2 cups flour, plus more for coating the dough and rolling it out
1 teaspoon of salt
3 egg yolks
2 eggs
2 tablespoons water
1. Add the flour and salt to the food processor bowl. Pulse a few times to combine.
2. Add the egg yolks and eggs. Pulse a few times at 10 seconds intervals.
The dough should be a light yellow color and beginning to form tiny, dry dough particles.
3. With the blade spinning, slowly add the 2 tablespoons of water through the plunger hole.
At this point, the dough should start to stick together with a slightly darker yellow appearance.
4. If much of the dough is sticking to the walls of the food processor, add a few tablespoons of flour and pulse again.
5. Remove the dough from the bowl and form a ball. Coat the the ball in flour so it doesn't stick to all surfaces.
6. Let the dough rest for at least 30 minutes at room temperature. It can rest in the refrigerator up to 24 hours.
7. Place a pot of water to boil while you wait. (It doesn't have to be large. Because the pasta cooks so quickly, I found it easier to cook the pasta in small batches.)
8. After the 30 minutes have passed, with a knife cut the dough ball into four parts.
9. Using a rolling pin (or a wine bottle works in a pinch) roll out one of the dough quarters into a thin sheet.
For pasta that will be sauced and served, try to roll the dough out to one eighth of an inch. For lasagna noodles, roll out the dough to one fourth of an inch. Keep in mind the pasta expands a bit while it cooks.
10. Use a knife to cut the pasta sheet into either squares, rectangles, or large sheets. Drop the pasta a few pieces at a time into boiling water, and remove it as soon as the pasta floats back to the top of the pot--about 1 to 2 minutes.
The final product, one topped with red sauce and meatballs, the with basil pesto.