Saturday, November 7, 2015

Cooking for friends on a weeknight: Roasted butternut squash with roasted onions and fennel


For the first time in my adult life, I have become friends with my neighbor. I have lived in apartments before and never interacted with the people with whom I share my walls. However, this time around, I have befriended one of my neighbors who does neighborly things for me like critiques my Halloween costume before I go to a party and sometimes plays backgammon or the guitar with me. This week, my neighbor gave me a bottle of olive oil from his parent's farm in Jordan and a bag of Zatar, a spice for dipping pita bread. In return, I asked him over for a quick dinner. My plan was to go buy a roasted chicken and make a salad, but I was struck by a sudden urge to use my butternut squash that had been staring at me for a week straight.  The original recipe has a decidedly middle eastern flare, as the original dish is roasted squash and onions, topped with roasted pine nuts and a tahini sauce. I paired my roasted squash with a mezze style meal of pita with Zatar, hummus and a garlic-yogurt sauce. 

My inspiration comes from a Yotam Ottolenghi  recipe posted in the New York Times last fall. Yotam Ottolenghi is a London chef, originally from Jerusalem, who in addition to his very popular middle eastern restaurants, has a great series with the Guardian, posting mostly fresh, vegetarian recipes.I highly recommend you check out this series. His recipes are beautiful and inspiring and just in time for Thanksgiving to branch away from the usual American style side dishes. I'm dreaming of his Turkish inspired eggplant  and stuffed squash.

Sometimes Ottolenghi's recipes require too many ingredients to be an easy weeknight meal. However, this squash and onion recipe is simple, delicious and can be changed to suit what ingredients you have on hand. It's a nice template of roasted vegetables + fancy sauce for garnish and flavor. 

coat generously with olive oil, salt and pepper
This recipe can come together quickly if you have a normal sized oven that fits more than one rack and baking dish. However, I literally have a playhouse kitchen and my oven does not fit more than one dish at a time. I had to roast the squash and onions separately for forty minutes, but if you can do it all at one time, this is a quick and easy dish to pair with a grain or a pan fried protein like chicken or fish filet. 

If you're reading my blog, you're probably my friend and know this blog is an amateur affair. Maybe, dear reader, you've been to my apartment and seen the dearth of kitchen space in my studio apartment. (Here is when I expect you all to be impressed that I cook in spite of these overwhelming obstacles...just kidding) I am playing with my lighting options and where I photograph my food. This post was photographed outside my kitchen on my dining room table using warmer albeit less lighting in comparison the the jarring fluorescent lights of my kitchen.  If you have a strong opinion on lighting or my blog, let me know what you think.  


Roasted butternut squash, onions, and fennel with a garlic lemon sauce
Adapted from Yotam Ottolenghi's  recipe posted in the New York Times 
Total time: 60 minutes

Ingredients: 
Butternut squash
one onion, cut in half and slice
1-2 bulbs of fennel, washed and thinly sliced
olive oil
1 large clove of garlic, crushed in a garlic crusher or finely minced
2-3 tbs of yogurt
2-3 tbs of ricotta cheese
the juice of a whole lemon (about 3-4 tbs)
plenty of salt and pepper

Preheat the oven to 400F

1. Wash the butternut squash, slice it in half, remove the seeds with a spoon. Cut each half into thin moon shaped slices. The peel of butternut softens with roasting  (or stewing) and you do not need to peel butternut squash. If you want thicker slices, when you place the slices on the baking sheet, you will place the squash balanced on its peel making it easier to soften the peel. 

2. Peel and halve the onions and fennel. Then cut the onions and fennel into thin slices. 
3. Place the squash in a large bowl, add 2 tbs of the olive oil, enough to coat the squash and well and season with salt and pepper. 
4. Spread the squash evenly on a baking sheet. Roast the squash for 20 minutes, then use a spatula to flip half way through. My squash baked for a total of 40 minutes, until it was soft and browning. 
5. Using the same bowl from the squash, place the onions and fennel in the bowl and coat with olive oil and season with salt and pepper. Place the onions in a roasting pan or on a baking sheet. The onions can roast in the same oven at 400F with the squash. The onions need about 20-30 minutes of roasting. You want them cooked through but not too browned. 
6. While the vegetables are roasting, in small bowl, combine the yogurt and ricotta, whipping with a fork until smooth and frothy. Then add the lemon juice and the crushed garlic. Whip again with a fork until smooth. Then season with salt and pepper. I seasoned my vegetables fairly liberally with salt and pepper so I seasoned my sauce with only pepper to let it have a prominently lemon flavor. Let the sauce sit and meld in the fridge. 
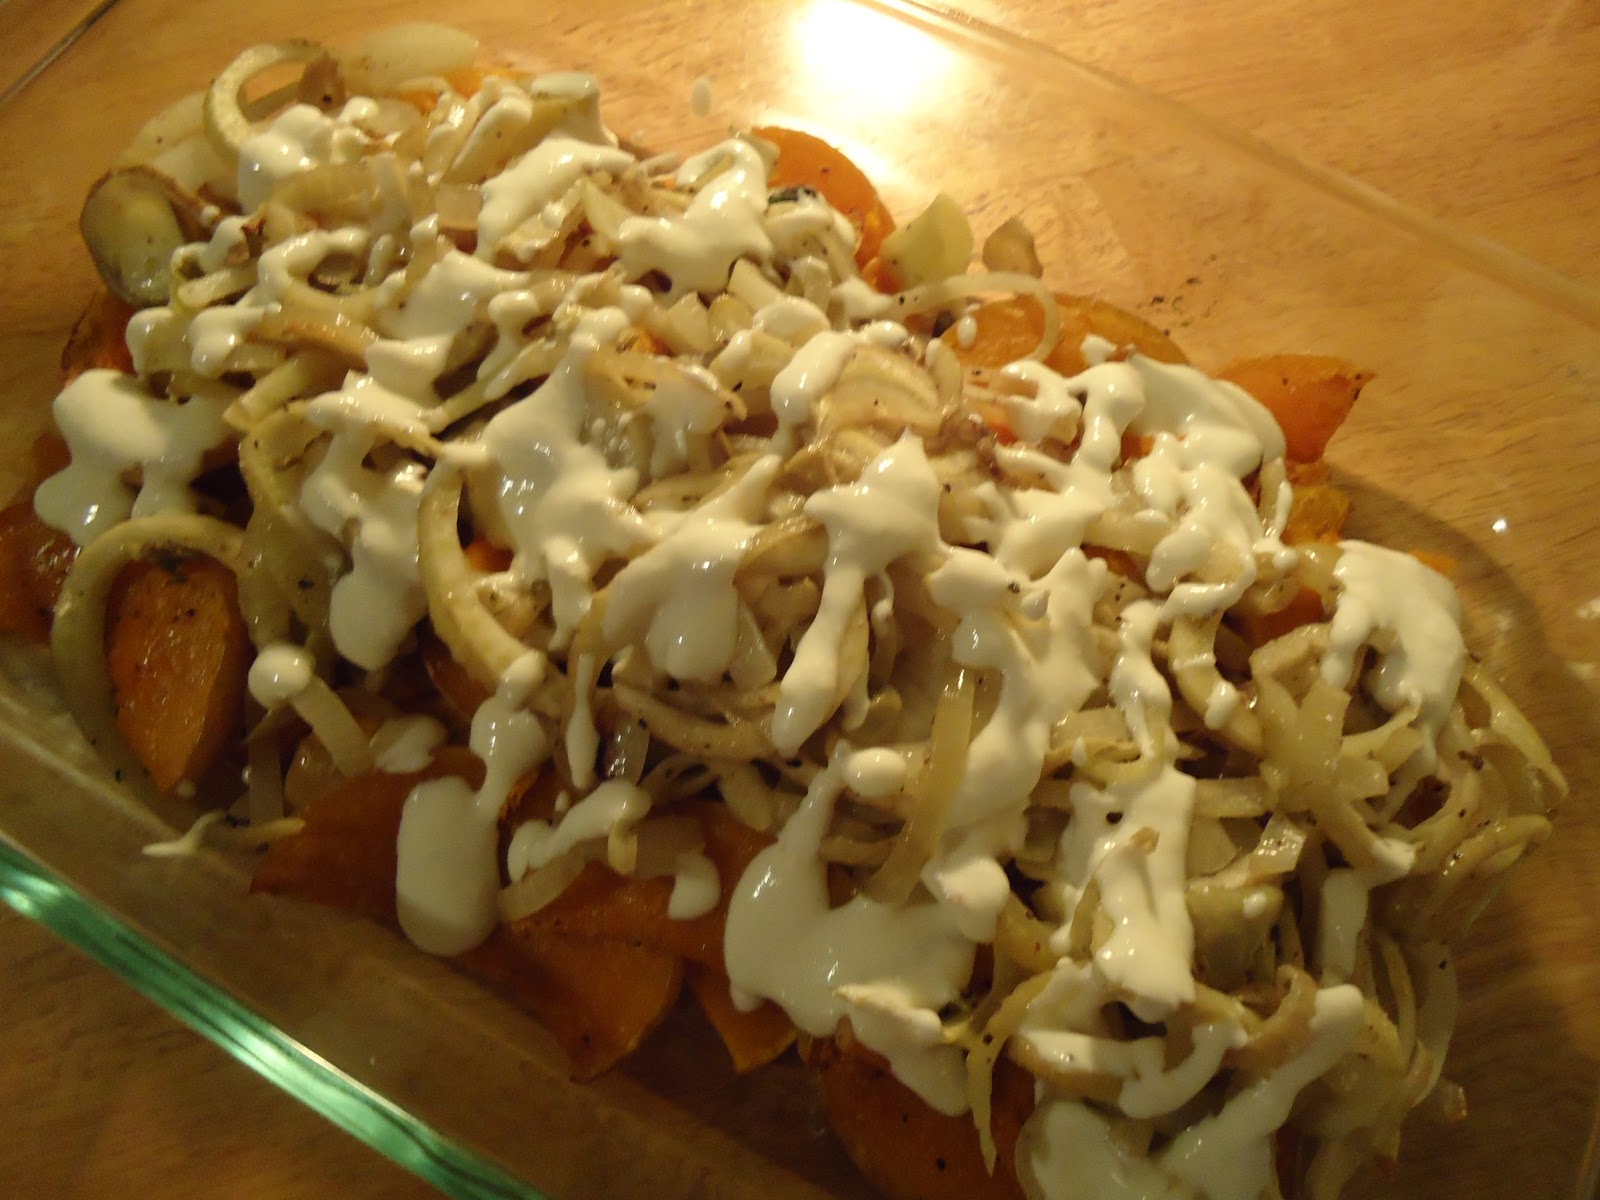
7. Once the squash and onions are cooked through, transfer the squash to the serving dish first. Arrange the squash as desired on the bottom and then arrange the onions on top of the squash. Using a spoon, drizzle the yogurt sauce over the vegetables. Theses are fresh Fall vegetables, so I did not drench my vegetables in the sauce. I reserved some of the sauce to use as a dip for our pita bread. 
8. You can serve this dish warm or at room temperature. 
Artfully arrange the vegetables

Drizzle with sauce

Wednesday, September 23, 2015

What interns eat: Peanut Butter and Jelly Overnight Oats

What I eat as an intern varies with each rotation. Overall the theme of cooking as an intern involves making food that comes together quickly and does not need to be refrigerated. I'll address the lack of refrigeration in a future blog posts, and you can refer to my black bean salad for a meal that can stored in your lunch box or backpack without a cold pack. I realize I could also just buy a cold pack or a better lunch box and solve this problem...

I spent the last 2 months working on the general internal medicine wards. I had a very regulated schedule of 6:30am to 6:30pm during the week, a long call day every 5 days, and working one weekend day until at least 3:30pm. The schedule is tough and sucks away any energy that might be left for studying or regular socializing. However, the hours are bearable because all interns are going through the same experiences,so there's a feeling of camaraderie throughout the hospital.  For the past 2 weeks, I've had a change in schedule working in the GW Hospital emergency department. Though I get more days days off per week on this rotation, I have had a hard time adapting to the strange hours and hectic, frenzied pace of the emergency department. Strangely, what irks me the most is the lack of time eat away from my computer. Most shifts, I eat a protein bar or trail mix while typing away at patient notes.


What I miss about my internal medicine rotation is the regularity of my schedule. Each morning, I could arrive between 6:30-6:45am, sit down at my computer to read about patients while eating my breakfast and drinking my coffee. I have a tendency to get obsessed with a certain food and eat it for too long.  For 2 months straight, every morning, I ate these overnight oats out of a mason jar. I miss those seemingly leisurely mornings, and I look forward to those mornings on internal medicine and eventually psychiatry rotations.

The concept of overnight oats is soaking "quick oats" overnight in liquid so they are soft enough to eat in the morning. There are many versions online of overnight oats, including peanut butter and jelly, almonds, coconuts, and dates, and sweeter, chocolate based recipes, and also many include chia seeds and other spices. Chia seeds will make the oats more gelatinous, and this reminds me too much of baby food. I could add more spices, but sometimes I'm lazy. Maybe for winter when I need more spice in my life, I'll add cinnamon, nutmeg or even pumpkin to my overnight oats.

Here are a few good links for overnight oats:
http://www.katheats.com/favorite-foods/overnightoats
http://ohsheglows.com/2015/07/22/vegan-overnight-oats/
http://www.bonappetit.com/test-kitchen/common-mistakes/article/how-to-make-overnight-oats

 My recipe is adapted from several online sources. Perhaps for my next two months of overnight oats I'll try a new version. For now, I offer you Peanut Butter and Jelly Overnight Oats. My unique contribution is that I use Trader Joe's Quick Cook steel cut oats. Because these are harder, basically small pebbles, even after being soaked overnight, they yield a firmer product in the morning. This way I avoid potential baby food or liquid concrete consistency.

When I make this recipe for myself, I use an assembly line approach and make 4 jars for the week.


Peanut Butter and Jelly Overnight Oats:
Soy milk
Quick cook oats (either rolled oats or steel cut oats)
Plain yogurt
Plain peanut butter, (I keep a jar of the Smucker's natural peanut butter which is also perfect for Asian peanut sauces)
Sugar
Frozen berry medley
Mason jar

Each step should be replicated for however many jars you want to make for the week

1) In the mason jar, stir together, 1 tablespoon of peanut and 1 tablespoon of plain yogurt and 1 teaspoon of sugar

2) On top of this mixture, pour in 1/2 cup of dried oats


3) On top of the oats, add in 1 handful of frozen berries, about 1/2 cup

4) On top of the oats that will be eaten the next morning, pour in 1/2 cup of soy milk. You can adjust the liquid to change the consistency of the oats. For firmer oats, stick to 1:1 ratio of oats to soy milk. For a more liquid product add up to 3/4  cup of soy milk.


One for tomorrow and ready for the
rest of the week

5) Mix together the oats, berries, milk mixture and let it sit in the refrigerator overnight.

6) You can store the rest of the prepared oats in the fridge, and the night before you plan to eat the oats, add in the soy milk, mix, and let it sit overnight. Re-mix the oats in the morning for a good distribution of berries, oats and peanut butter.

7) Experiment! Add a banana or almonds or cinnamon or more sugar or chocolate chips or cheerios to make your Friday morning that much better. Go crazy. What I love is that every morning, I get a pre-made, healthy, non-processed breakfast, made with love by me for me.  To survive residency, I think I will need lots of rituals and acts of self care, and overnight oats falls into this category.


Ready to cover and mix in the morning for instant breakfast


Wednesday, September 16, 2015

Cooking with friends on a weeknight: Asparagus, mushroom, rice gratin

I hope "cooking with friends on a weeknight" will become a feature of the blog. Cooking with someone else and blogging about it proves it is possible to be an intern and maintain a social life outside of drinking wine and watching TV on my tablet. That said, for someone who counsels patients on establishing and maintaining healthy habits, I know I do not sleep enough and maintain myself on liquid caffeine, daily yoga, and lots of chocolate for extra energy. Basically I'm asking for a daily sugar crash and helping my family history of type 2 diabetes express itself.  For now I think the benefits of spending time with friends outweighs the benefits of 8 hours a sleep a night and ingesting too much processed sugar.  Let's see how I feel in another month...

I am currently on my Emergency Medicine rotation which means I work many night shifts and have some free daytime hours. Though the strange sleeping schedule  will eventually catch up to me, I love having the daytime hours off. I happened to have a full day off on Wednesday.  The weather is perfect in DC with low humidity, high of low 80s, and daylight that lasts until 7ish. With my day off, I offered to bring ingredients for a "surprise dinner" to my friend E's house. My plan was to walk around Trader Joe's and see what ingredients jumped out at me. I am proficient enough in my own kitchen to buy random ingredients, usually whatever is in season, and at home I'll look up recipes or just make my usual meal of roasted vegetables with tofu or eggs.


Today I actually had to walk out of the store with ingredients to make a satisfying meal for other people. When I need inspiration, I usually look at the front page of my current favorite blogs. Before walking into TJ's I checked out Cookie and Kate, Serious Eats, and Smitten Kitchen. Smitten Kitchen has gorgeous pictures and delicious recipes, but can be hit or miss with actually providing accessible after work (I'm tired and have no time) dinner recipes. Today, however, Smitten Kitchen did not disappoint. The home page featured a summer squash rice and cheese gratin inspired by Julia Child.
The joys of cooking an a friend's (much larger) kitchen

Inspiration is the key word. I was unimpressed by the summer squash at Trader Joe's and the Foggy Bottom Farmer's Market (Weds, 3-7pm) that likely was overflowing with summer squash and peaches did not open for another 2 hours. So I made do with Trader Joe's produce. I ended up buying asparagus, mushrooms, rosemary Asiago cheese, and a pork loin as the protein.


Dinner was a success: As an appetizer, pan fried Shishito peppers tossed with lemon juice and salt, followed by roasted pork tenderloin served with asparagus, mushroom, rice gratin, and brownies for a decadent finish. This meal satisfied several senses, as E and I painted with watercolors as the gratin and meat percolated in the oven.
Browning the tender loin and pan frying the Shishito peppers

Here I present an original recipe: Asparagus, mushroom, rice gratin aka a quick and fancy casserole

Ingredients:
1 pound of asparagus
1 package of sliced white mushrooms
1 yellow onion
1/2 wedge of Asiago or Parmesean cheese
1 cup of rice
1.5 cups of water
olive oil
salt
pepper
1/2 lemon, optional
medium sized baking dish

Preheat oven to 350 degrees F
1) Wash and trim asparagus, chop into 1 inch pieces
2) Dice onion and coarsely chop the sliced mushrooms. Over medium temperature, heat olive oil in a skillet. Saute the mushrooms and onions for at least 5 minutes, so the onions are softened and some water releases from the mushrooms
3) In a small pot, bring the 1.5 cups of water to a boil, add the 1 cup of rice and boil for 5 minutes. After the 5 minutes, turn off the heat and allow the rice to sit in the water while you finish preparing everything else.
4) Place the asparagus into the baking dish, pour in the mushrooms and onions. Combine well, then pour in the rice and water. This water will allow the vegetables and rice to steam during baking to complete the cooking.

You can be as generous or stingy on the cheese as you like. Most gratins are saturated with fats like butter, milk/cream, and cheese. In this gratin the major fat is the cheese and a bit of olive oil.

5) Using at least half of a medium sized wedge of Asiago or Parmesan cheese: crumble half your cheese using your hands, basically making small cubes, and use a grater to finely grate the remaining cheese. Add the cheese in with the vegetables and rice and combine well so you can see cubes of cheese throughout.
6) Season this mixture with 1 tsp of salt, a few grinds of pepper and the juice of half a lemon. Stir to combine, then use a spoon to smooth the top.
Before baking

7) Cover tightly with foil, and bake in the oven at 350 for 20-30 minutes. This gratin baked in the oven at the same time as our pork loin for 25 minutes.

For a traditional gratin you can add breadcrumbs and cheese to the top of the gratin, and broil at 450 for 5 minutes.
The finished product after serving 


Sunday, September 6, 2015

What interns eat: Mexican corn, bean, and zucchini salad aka corn salsa

As many of you know, I am a psychiatry intern who started on July 1, 2015. I'm currently on internal medicine wards, so I'm living the life of a traditional intern working at least 80 hours  a week and learning so much that sometimes I feel like my brain is expanding out of my skull. It's an interesting  and tiring feeling . Who knows why I felt the need to start blogging again the in the context of being tired and overworked. My psychodynamic theory is that I need to identify with something other than medicine so activities like food blogging and yoga keep me human. 


I am one of the lucky interns who works Labor day. Mostly I'm happy that I'm not the unlucky intern working Thanksgiving or Christmas. Who knows what patients I'll encounter tomorrow...Maybe the sweet grandma with community acquired pneumonia? Or perhaps, more likely, the older, usually drunk gentleman, who decides that Labor day weekend is the perfect time to try to quit alcohol and starts withdrawing. In order to provide compassionate and effective care in either one of these scenarios, I pack breakfast and lunch of delicious food prepared in my tiny kitchen. 

I find cooking relaxing. However, I cook for both sustenance and a way to unwind--I have to be efficient in the kitchen. Today, in 2 hours,  I prepared an eggplant and tofu stir fry, the vegetable salad I present today, and made breakfast for the week. This way I have most of my meals covered throughout the week and can supplement the missing meals with fried eggs or kimchi quesadillas. 
Lots of tiny kitchen cooking and dish-washing

I've recently made many iterations of the "vegetable salad" which is basically chopped vegetables tossed with a tasty sauce. Last week I made a tomato, artichoke heart, cauliflower, pesto salad.  A vegetable salad is versatile  and can be eaten over rice, noodles, with an egg, on top green salad, or any other way your imagination might lead you. I make a good amount of the chopped vegetable salad and eat it in a variety of ways for either lunch or dinner. This way, I'm not always eating in the hospital cafeteria or spending too much money at the super trendy and too attractive Whole Foods two blocks from my apartment. 

This week, this vegetable salad is a result of half-hearted grocery shopping as I haven't sincerely grocery shopped in two weeks. I cobbled this salad together with vegetables left over from my last trip to  the farmer's marks and this morning, I went to the Dupont farmer's market with a visiting friend. 

Farmer's market goods and the
last of my HEB products


Mexican corn, bean, zucchini salad with salsa verde aka the Mexican chopped vegetable salad aka corn salsa

2 ears of sweet corn with the kernels off the cob
2 summer squashed, halved and thinly sliced
1 clove of garlic thinly sliced
a large handle of cherry tomatoes, quartered
3 carrots, cut into small cubes
1 can of red kidney beans or black beans
about 1/2 cup of green salsa (Usually, I prefer the small can of Herdez salsa verde sold in the Latin section, but I had the end of a jar of Trader Joe's Hatch Valley green salsa
olive oil
salt to taste

Chopping all the vegetables is the most time consuming part of this recipe, but once everything is chopped, the salad comes together in 10 minutes


1. Start by washing and thinly slicing the zucchini aka summer squash and slicing the garlic
2. In  large frying pan, add 2 generous tablespoons of olive oil, once warmed over medium heat, add the sliced garlic to flavor the oil. Do not burn the garlic, we are going for a subtle taste of garlic. Add the sliced zucchini in a flat layer to the oil, and let it sit without stirring for about 5 minutes. The goal is lightly browned zucchini. After these 5 minutes, shake the pan, cook for another 2-3 minutes and then pour the zucchini into a large bowl. 
3. While the zucchini is browning, you can start to prepare the rest of the vegetables: slice the kernels off the corn, cube the carrots, and tomatoes, wash the kidney beans
4. Combine all the vegetables together in a large bowl. Add the green salsa to the vegetables, and gently mix together. Add salt to taste.


 Enjoy as a salsa with chips, use it as the filling for tacos, eat as a topping for fried eggs, the options are many. Another great addition is adding avocado and scallions right before you serve it.

 This salad can be made with any type of vegetables that mix well with Mexican flavors. In winter time when I want homemade salsa, I use canned corn, canned black beans, radishes, red onions, and carrots and because of modern agriculture tomatoes are available year round. The basic formula is canned beans, 2 types of crispy vegetables, tomatoes, a little bit of onion and salsa. Viola, you have food  for a party or food for the week. 

Mason jar lunch 

Sunday, August 30, 2015

Cooking with friends on a weeknight: Fresh tomato sauce

The finished product


Cooking and eating with friends is always better than cooking and eating alone. Even better than indulging in cheese and chocolate while watching a Netflix marathon...

I'm making new friends in DC and part of that means inviting myself over to dinner at friend's houses. Or rather having friends who are welcoming and ask me over for dinner. It helps that through my residency program,  I've met wonderful, lovely, friendly open people who allow me to come over and hang out in their kitchen. Having friends like this is a refuge--fun, relaxing, delicious refuge.

Last week, I took up my friend/co-intern on her open invitation to dinner at her house during the week. Since I mostly prepare vegetarian food for myself, I have added a few vegetarian blogs to my browsing repertoire. One that I really enjoy is Cookie and Kate, as I find most of her recipes accessible in terms of both ingredients and prep time. I liked the look of this fresh tomato sauce, essentially an uncooked tomato sauce, that shines during the hot summer months when it is possible to get fresh, juicy tomatoes at the farmer's market. On Wednesday, I purchased a few golden heirloom tomatoes and fresh garlic to take to my friend's house to make this sauce. 

Spiralizer in action
My friend and her fiance live a short, uphill bike ride away in Georgetown. Biking in Georgetown has the potential to be enjoyable, gliding by the beautiful brick homes with their lush front gardens. However the hills and the aggressive drivers make for a harrowing weekday-evening bike ride through the narrow streets. The drivers in Georgetown believe that if they drive fast enough the roads will magically widen to accommodate their luxury SUVs. The cars tail me closely as I try to bike as quickly as possible up serious hills, but my legs feel like they might burn off after 15-30 seconds of pedaling on pointe. I'm out of shape and the impatience of drivers on my tail or zipping past me does not improve my oxygen capacity.

I arrived to my friend's house, a bit weary and sweaty, but ready to go for a short dog walk before preparing a simple late summer meal. My friend suggested instead of pasta we use her Spiralizer, a pretty cool contraption that quickly turns any fruit or vegetable into pasta-like strings. My co-intern's fiance took on the Spiralizer; she prepared the roast chicken legs; I made the pasta sauce, and their dog kept vigil by the counter for scraps and company.

Simple Fresh Tomato Sauce, adapted from Cookie and Kate, originally from Bon Appetit

Ingredients:
4 medium sized tomatoes, preferably fresh tomatoes, maybe from the farmer's market
1 large clove of garlic
1 handful of parsley leaves, washed and coarsely chopped with a few runs of a knife in either direction
the juice of one lemon
2 tbs of olive oil, more or less, just add for taste and sauce consistency
1 tsp sugar
salt and pepper to taste

1. Cut two and a half of the tomatoes into small cubes, retaining the seeds and liquid pulp and place in a large mixing bowl
2. Using a box grater, grate the remaining one and half tomatoes into the bowl. Use the medium sized holes to get a fairly pulverized tomato. Toss the left over skins.
Chopped and grated tomatoes
3. Mince the clove of garlic and add it to the chopped and liquefied tomatoes.
4. Squeeze the lemon into the bowl with the tomatoes, garlic and lemon.
5. Add the 1 tsp of salt and about a 1 tsp of salt (3 pinches of salt) and add a few turns of coarsely ground pepper.
6. Mix well and let this sauce sit for at least 10 minutes, more time will only make it better. Ten minutes is about the time it should take the pasta to cook. We left our sauce for longer as we took a break to watch an episode of Parks and Recreation and let the chicken roast in the oven.
7. At the last moment, before adding the sauce to pasta, add the chopped parsley to the tomato sauce and stir to combine parsley and sauce.
8. Once the pasta (or spiralized zucchini) is cooked, add in the sauce to the pan with the cooked (and drained) pasta and toss to coat. If using actual pasta, you may want to add a few tablespoons of the cooking water to the tomato sauce. My sauce was very watery and did not need any extra liquid, I actually strained away a bit of liquid as I scooped the sauce onto the zucchini.

9. Toss the pasta and sauce until the pasta appear well coated. Serve the pasta onto plates and top with freshly grated Parmesan cheese.


Wednesday, August 26, 2015

DC come-back: Pressure Cooker Sweet Corn Soup

From 2011: A view of my old studio apartment.
I swear the new one looks just like this...
I hope this post is my transition back to food blogging. Ironically, the desire to blog comes from being back in DC, the place where it all began. There is something energizing about being back in the city. This evening was so lovely-- high 60's, the sun was soft, no breeze. It was an evening that felt like swimming in water of the perfect temperature.  I decided to walk up to Shaw near R and First street, just wandering up and down streets, looking at colored town houses and smiling at everyone else who decided  the evening deserved to be spent outside either on a patio, their stoop or walking. I walked past so many new restaurants that I wanted to try, so when I arrived home, I just couldn't spend another night eating a kimchi quesadilla (definitely a post on my new  go to dinner at a later date)

 I moved to back to DC for residency, and I have these constant flashes of my previous life here. It's like deja vu in which I am actively walking through old memories of events that occurred in this city. I spend 12 hours a day in GW hospital and often from the windows of patient rooms, I can see the brick facades of my freshman and sophomore dormitories, Fullbright and JBKO. It's a bit like living with one foot in the past. Things are certainly different now. For one, I'm way cooler now that I'm a bonafide doctor. I make more money. I'm more confident. Yet today I shopped for fresh ingredients to make this soup at the same Wednesday Farmer's market where I shopped in college. My living situation in DC didn't really improve. I am living in a different building, but my current studio feels just like the studio apartment where most of the posts on this food blog were made. I'm back to cooking in the smallest possible kitchen with crappy fluorescent lighting. I have 3 cabinets, so all of my dishes and implements are stored in an industrial shelf outside of the kitchen. My counter space is non-existent so yet again, I have to lay a cutting board over my sink to actually cook in my kitchen. In summary, four years later, back in DC: I'm a doctor with a closet for a kitchen. On a positive note, I have upgraded my location to Logan Circle, so my tiny kitchen is located in the coolest neighborhood within a reasonable walk to GWU.  

SO enough complaining. Life is great considering I am working 80 hours a week and still find time to walk around and try to blog.  I can't help but laugh at how far I've come and how nothing has changed. 

As evidence that many things don't change, I still browse food blogs when I have downtime at work.  On a particularly slow day at work yesterday, I  was randomly clicking through Serious Eats and found this simple recipe for sweet corn soup made in a pressure cooker. I was given a pressure cooker by a friend in Galveston, and I have been trying to master the art of making different beans and curries. It's an old fashioned, stove top pressure cooker that whistles to relieve pressure. I love my pressure cooker; it really does speed up cooking. 

It's still sweet corn season, and I knew my Wednesday farmer's market would have plenty corn and fresh ingredients to make this soup. So after my hour long wander through Shaw, I came back to my sweet, tiny studio  and its kitchen and whipped up this soup to take to lunch for the next few days. 

Here's the quick and easy recipe that I hope will rekindle my blogging fire: 

Pressure Cooker Sweet Corn Soup (adapted from this recipe on seriouseats.com)

Note the old fashioned pressure cooker cover in the top right corner
Ingredients: 
1/2 white onion, coarsely chopped
sweet red pepper
2 cloves garlic
4 ears of corn
4 cups of broth, either prepackaged box broth or reconstituted from bullion
bay leaves
olive oil
salt and pepper


1. Coarsely chop the garlic, onion and red pepper. Heat 3 tablespoons of olive oil in the pressure cooker. Over medium heat, saute the vegetables until softened and slightly browned, about 5-10 minutes. 
2. While the vegetables cook, shuck the corn and remove the corn from the cobs. Reserve the cobs and cut them in half to fit into the pressure cooker


3. Add 4 cups of broth to the pressure cooker. (I didn't have any broth in a box or frozen broth, so I dissolved 2 bullion cubes in 4 cups of water) Then add in the corn kernels and the 4 cobs cut in half. I think the cobs help contribute to a sweet corn taste, especially as the soup is not cooked for very long.  
4. Stir to combine the corn components and other vegetables, add the bay leaves.


5. Close the lid to the pressure cooker and turn up the stove heat to medium to high, so you hear the cooker top rattling for a good 10 minutes. Keep on the stove until the pressure cooker has whistled 2 times,then turn down the heat and cook for another 15 minutes on lower heat, with the top still rattling. 

I realize the directions above sound like nonsense to someone without this style of pressure cooker.The original recipe on seriouseats.com simply instructs to cook the soup at the high pressure setting for 15 minutes. 

6. After 15 minutes, relieve the pressure by lifting the top and releasing all the steam and then run water over the pressure cooker for one minute. Remove the top and let the soup cool. I let it sit on the stove for 30 minutes while engaged in my other favorite activity, a short yogaglo.com yoga class. 

7. Once the soup is cool, puree the soup with an immersion blender or you can add it to batches into a blender or food processor.  

My immersion blender is now my new favorite tool as neither my blender nor my food processor made the move to DC. Both were old, decrepit and unworthy of precious storage space. I would love to buy a fancy new cuisine art food processor, but every pay check is already allocated for a different luxury good like new boots, a cool fall blazer, concert tickets, and all of those fun city living activities that make my tiny kitchen bearable. 

8. Once the soup is smooth, season to taste with salt, pepper, and an extra tablespoon of olive oil to round out the taste. 

9. Ladle into your preferred serving container and garnish with either more corn, scallions, tomatoes, and eat cold or hot. 
Mason jar lunch for Thursday

These days I eat a lot of my breakfasts and lunches out of mason jars. First of all it's easy to transport,even with a bumpy bike ride to work. For some reason eating out of jars makes lunch more enjoyable, like a makeshift bento box.  

Thursday, May 21, 2015

Hsipaw: a bit of Shan country


Our Nat-spirit protected taxi, delivered us safely to Hsipaw. We arrived at Tai House resort, a brand new hotel built to accommodate the backpacker  boom in Hsipaw, fueled by the city's reputation as a jumping off point for treks into the Shan hills. A more adventurous traveler might venture to Lashio, further north in Shan country, closer to the skirmishes between Myanmar and a small group of separatist rebels. I celebrated my 27th birthday in Hsipaw. Myanmar cuisine offers many sweets, but chocolate cake isn't exactly a popular local dish. With the help of the guidebook, we found a decent brownie, and I celebrate the beginning of my 27 years with roast duck, cake, ice-cream and Mandalay rum.

In the fields outside of Hsipaw 
The Shan state and other outer border states that are home to Myanmar's other ethnic groups who had their own princes and governments similar to the maharajas in colonial India.  After World War II, Burma gained independence. In 1948, many of these states and rulers signed the initial constitution which was supposed to protect their autonomy and the eventual  right to secede in 10 years. With the military coup in 1962, the army quashed all notions of autonomous states and attempted to bring the country under their iron fisted control.

Entrance to an educational
 monastery 
The last Saopha of Hsipaw, Sao Kya Sen, was a progressive ruler, who after surviving the Japanese occupation of northern Burma, attended the University of Colorado and while the the US met and married an Austrian woman who became his princess. Together they tried to modernize agricultural practices and improve education.  In 1962, in the first few days of the military coup, the Saopha was kidnapped and eventually executed by the army for refusing to cooperate with the Tatmadaw demands to aid them in destroying  the Shan rebel army. The military government has never admitted to his disappearance and death.

Rice noodles drying outside
 a local factory
Hsipaw is a major agricultural center, surrounded by farming villages and cash crops such as rice, soy beans, and corn. Sam and I took a 5 hour guided trek with a local guide. He led us through Hsipaw showing us the local rice mill, noode factory and then into the villages. In addition to Shan villages, outskirts of Hsipaw was well populated with monasteries. Our guide  (after jokingly asking me if I was a spy) admitted to being part of the 88 Generation. This is the group of university students who on August 8, 1988, protested against the oppressive military rule. The protests were ruthlessly quashed, thousands were killed by the army and the bodies were collected in truck beds and delivered to crematoriums. The 88 generation annointed Aung San Su Skyi their leader. After years of personal sacrifice, harassment by the military government and her long house arrest she remains the official leader of the National League for Democracy (NLD).

Nat shrine at the village entrance 

At the Nat animal workshop 
All that introduction to say our guide was fairly open about the history of Myanmar though subtle in his criticisms. He said because the education within  government provided  schools is poor AND they are not free, educational monasteries fill the gap, at least for primary education. Monasteries take on novices and nuns. These are young children, about 5 to 12 whose parents send them to the monastery to live for a few years to receive primary education and learn the tenets of Buddhism. The monasteries are supported by donations from the villagers in the form of money and food. Hsipaw was full of little boys running around in the red monk robes. Many of the monasteries we walked through had 50-70 novices. Despite the dominance of Buddhism, Animism remains active in Shan villages  through worship of Nat spirits. Each village has a Nat shrine "before the Buddha" at the entrance of the village. Some are raised platforms, decked with red and white flags with offerings of flowers, water, and fruit. Some of the shrines contain large wooden animals representing major animal spirits meant to protect the whole village. It seems Nat worship complements Buddhism, since inside each house a Buddha shrine also receives daily offerings and prayers.
Nat shrine along the path,  a Nat spirit
resides in the "empty " space 


Rainy walk to the teak monastery 

The crumbling pagodas of Little Bagan 
Sam navigating us through the
 back roads Hsipaw 
The rains began in earnest during our stay at Hsipaw. Our 5 hour hike was the last clear day in that it only rained once during the day and again at night. Rain poured all night long and into each morning. We had wanted to take a 10 hour hike to the Paluang  villages where tea is grown. However, we were dissuaded by the rain and muddy, slippery tracks. Each day, despite persistent showers, armed with waterproofs and umbrellas, we took short walks around Hsipaw to see the crumbling pagodas of "Little Bagan" and more villages and monasteries. We spent a lot of time reading on our porch or attempting to use the very slow wifi. I often had to remind my impatient American self that not only is open access to the internet fairly new to Myanmar, wireless internet and 3G are very new. Just one year ago, a SIM card cost $200 dollars, now they are $2 at every street corner. (Local lore courtesy of Samuel Pursch)

Trash along the creek bed
It must be said, Myanmar is a bit rough around the edges. There doesn't seem to be official trash collection or disposal outside of Yangon. The banks of picturesque country streams are covered with the detritus of village living.  Along the railroad tracks, litter lines the path. Even Yangon doesn't have regularly stationed trashcans. On my first day in Yangon, I couldn't figure out where to throw the bits of plastic that sealed the tops of purified water bottles. The crinkly plastic accumulated in my pockets until Sam suggested I throw it on the ground like the Myanmar do. In place of trash cans, the city employs a legion of street sweepers. Still, the city and the countryside are dirty and littered, and I don't want to see the stew it becomes when the real monsoon rains arrive.
Common sight of a motorcyclist
 holding a umbrella while driving
Now I'm on the 15 hour bus back to Yangon. We are slowly retracing our path back to Pyin Oo Lwin to Mandalay and then back to Yangon.  We are inching along the hairpin turns and switchbacks etched into the hills that flank the Goteik gorge. Motorcycles occasionally pass us, there is a line of equally large coach buses and trucks crawling along behind us. I can feel gears grind to brake on the steeper decline and pull us back up the steep ascent. In the morning we'll reach Yangon, but not until we've taken a few rest stops. The driving here is hard, and even in my impatience to get home, I can appreciate the need cool down the engine and restock on Betel nut and tea.

Village path along the river


Shan Hills around Hsipaw 

Shan hills,  more pagodas